top of page
gRAPHIC DESIGN 2
project 2:
what I did:

I started a whole new document with the usual measurements that I use. I found an image of a dagger vector that I liked and I decided to incorporate it into a design. I also saw a design logo on the wix builder website and I thought it would look cool with the project I had in mind.
This is the image and the design I'm using.
After importing the dagger vector onto corel. I attempted to trace the image. However, the design came out extremely pixelated. I tried to increase the smoothness of the tracing, but things went south. It ended up being pixelated.
This isn't what I wanted :(
I got advice from my teacher, Mr. c, and he said I should convert the image into grayscale to see if that would help me out because the background image color was what was messing things up for me.
At the top of the corel screen there are these options.

For my next step, I use the bitmaps option.
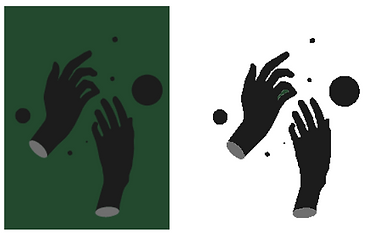
I clicked on the hand image I was wanting to edit, then clicked bitmaps, and I chose edit. It then took me to corel photopaint. In this program I converted the image to grayscale and saved. After saving I went back to corel and imported the new hand image. I attempted to trace the bitmap again and it worked like magic baby.

Image is on the right and the final design is on the left.
If you look at the hand you can see the program included the little gray spot between the thumb and finger. I just clicked on the hand went to object, which is an option at the top of the screen, clicked on group. I finally clicked on the last option which was ungroup all. I deleted all of the little parts of the design that I didn't want to include and then regrouped everything.

Before

After
After spending a PHHHHHHAAAAAATTTT minute with the hands, I started to work with the dagger. I clicked on the traced image of the dagger. As soon as I did that my options at the top of the screen changed.

From this
To that
I rotated the dagger 270 degrees.

I then enlarged the dagger and put the hand on top of the dagger.

I decided to add another hand. I did this by copying the design and I mirrored the hand I created from the copy.
I attempted to do a mesh fill onto the hands, but it wasn't working at all. I asked Mr. C for assistance and he told me to put a boundary. Boundary is located in the object section at the top of the screen. Then you click on shaping and another screen will pop up. On the screen it'll say trim, weld, simplify, etc. I then clicked on the option "Boundary".


I'm not wanting the boundary to be red, I made it red so you guys could see the difference.
After getting the boundary set, I used the command mesh fill tool. However, with the ring finger and the pinkie I had to lock the space and the contour because I wouldn't have been able to do the mesh filter. With the filter, the top screen changes.

These are the changes that occur while you have the mesh filter activated.
When you have the object selected for the mesh filter this is what it looks like.
I wanted there to be a gradient from the finger tips. While you have the mesh filter active, you can click anywhere on the object to add a color. I only did one color, which was black. With all of the lines I could adjust how the black faded and where to. After adjusting the lines to make the black fade into the way I wanted to, I ended up with this.

This is where I had the black start.

I did the mesh filter to the other hand and moved them onto the dagger. I also added a shadows to the hands.


I wanted to add flowers that go behind the dagger and hands. This is the image that I used and I bitmap traced it. After bitmap tracing it I turned the stems and leaves of the roses green by using the eyedropper tool. For Each petal I had to create their own individual boundary in order to do a mesh filter. The colors on the roses are red, maroon, and white. The red color is going to be more towards the dagger.


Before the boundary

With the boundary
After doing this to a total of four roses, I arranged them around the dagger and the two hands.

With the mesh filter

bottom of page